Chapter 4: Managing Purchase Orders
Once you have created the purchase order, you can perform the following actions on it:
-
Submitting the Order
-
Accepting/Rejecting the Order
-
Withdrawing the Order
-
Tracking Status
-
Deleting the Order
-
Viewing Print Preview
-
Creating Change Order
-
Accepting/Rejecting Changes
-
Copying Order
-
Cancelling Order
-
Closing/Reopening Order
-
Viewing Audit Log
-
Creating Receipt
-
Creating Invoice
You must have the Purchase Order Full Control activity to perform all the actions on the order.
The document header, by default, displays two primary action buttons, and the remaining actions are displayed under the More dropdown list. Based on that, the instructions mentioned in the following sections might differ from their appearance in the actual application. If a particular action is unavailable as a primary action, please access it under the More dropdown list.
4.1 Submitting the Order
Once you have entered all the information in the sections, you must submit the order to the Supplier for verifying it.
You must have the Submit Order activity to submit the order.
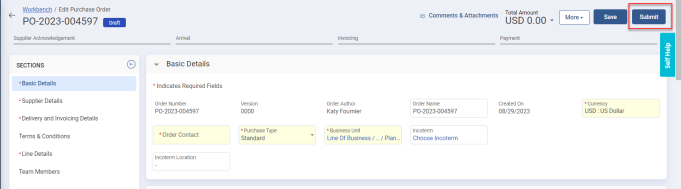
To submit the order:
-
Open the order.
-
Click Submit.
-
Click Yes to confirm your action. The order is submitted and notified to the Supplier for verification. That order now appears in the Open state which indicates it is sent to the Supplier.
If an order is in the Rejected or Withdrawn state, you can make the necessary changes and submit it again.
4.2 Accepting/Rejecting Order
Once the Buyer submits the order to the Supplier, the Supplier must verify the items and their corresponding details to accept, reject, or accept it with changes. The order must be in the Open state to accept/reject it. The Supplier can either accept/reject a single line or all the lines that are in the Open state.
You must have the Reject Order by Supplier activity to reject the document.
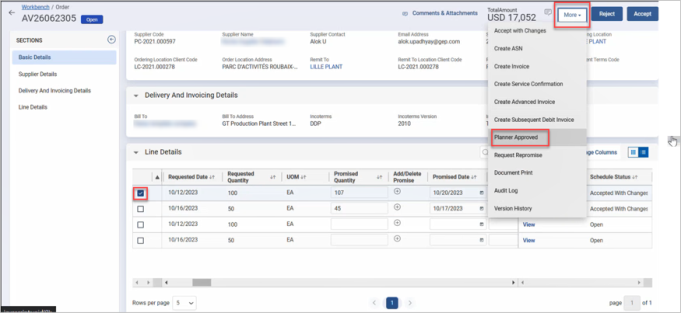
4.3 Planner Approved and Request Promising
You can move Accepted with Changes order to Planner Approved or Request Repromise status. A Supplier must provide Promise Again for Request Repromise order lines and schedules. Once Buyer approve promises, supplier can create execution documents. Please note that if the entered value is within the configured range, the order is Planner Approved automatically. If the Buyer does not agree with Accepted with Changes promises, then the Buyer will move the order status to Request Repromise.
You must have the Planner Approved and Request Promising activity to change the status.
To change the status:
-
Open the document.
-
Select a line item under Line Details. Please note that this activity is applicable only for Accepted with Changes status.
-
Click More > Planner Approved or Request Promising.
4.4 Withdrawing the Order
Once you submit the order and it’s still in the Pending Approval state, you can withdraw it to make the necessary changes and re-submit it again.
You must have the Withdraw pending order activity to withdraw an approval pending order.
To withdraw the order:
-
Open the document that is in the Pending Approval state.
-
Click Withdraw.
-
Click Yes to confirm your action. The order goes back into its original state.
-
Make the necessary changes to the order document.
-
Click Submit.
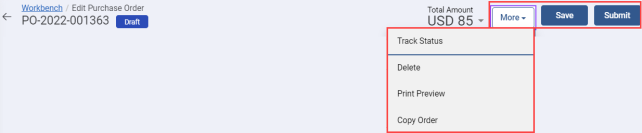
4.5 Tracking Status
You can track the order’s approval status within the order document. The application allows you to track the approval status in all the document states.
To track the approval status:
-
Open the document.
-
Click More > Track Status. The Approvals page opens.
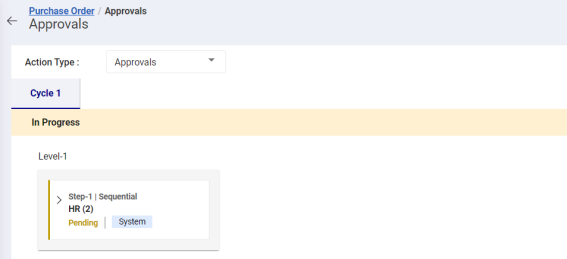
-
View the status and click the Back arrow to go back to the document.
4.6 Deleting Order
You can delete an order document if it was mistakenly created, or it’s no longer needed. You can delete the document only when it’s in the Draft, Rejected, and Withdrawn state.
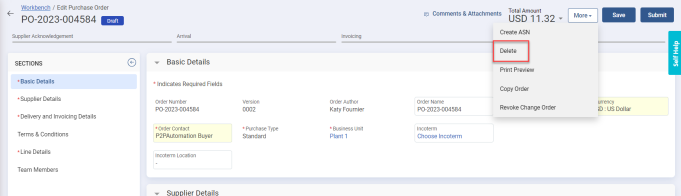
To delete the order document:
-
Open the document that you want to delete.
-
Click More > Delete.
-
Click Yes to confirm your action. The document is successfully deleted.
4.7 Viewing Version History
You can now see history details for all the previous versions of the change order. You can see the current changed order amount in the Highlights along with the Last Modified Date. To view Change History, click the More  icon on the top-right corner of the order page, and click Change History. The Change History page for that order document, displaying the different versions, is displayed:
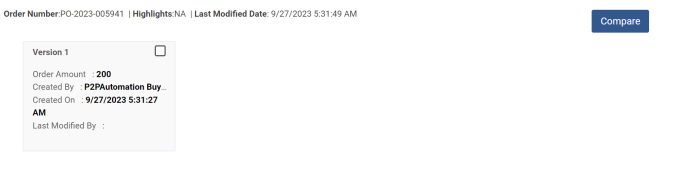
The Compare button lets you compare selected versions of the order.
4.8 Viewing Print Preview
You can print preview the document before printing it. The application allows you to view the print preview and print it in any state.
The application generates Barcode and QR Code in the PO PDF. This feature is configurable with backend setting as per your requirement.
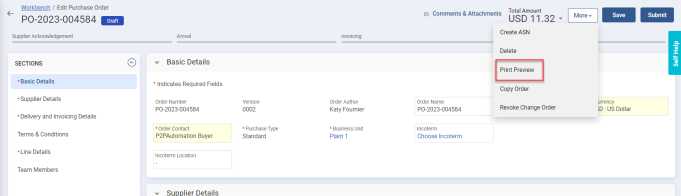
To view the print preview:
-
Open the document.
-
Click More > Print Preview. The Print page opens.
-
Make the necessary configurations and click Print. You can also use save it as a PDF.
4.9 Accepting/Rejecting Changes
While verifying the document, if the Supplier makes the changes and accepts it, it is sent back to you to either agree by creating a change order or disagree by doing rejecting the changes.
You must have the Accept with changes activity to accept the document with changes.
The Supplier can update only the following fields in the Line details:
-
Supplier Suggested Unit Price
-
Promised Date
-
Promised Quantity
The editability of these fields is based on the combination of Item Source, Purchase Type, and Price Basis fields.
Approval is required when the Purchase Order is moved to Accepted with Changes status for delivery and price promise.
To accept/reject the changes:
-
Open the document to make the changes.
-
Validate the order.
-
Make the necessary changes to the document.
-
Click More > Accept with Changes. The selected open lines will be accepted with changes.
-
Click Yes to confirm your action. The order now goes back to the Buyer. To accept those changes, you must now raise a change order.
If you do not approve those changes, click Reject Changes. All the updated lines which were in Partially Accepted or Accepted with Changes status will be rejected. Click Yes to confirm your action. The lines with supplier changes are rejected and the order returns to the previous state.
4.10 Creating Change Order
If the Supplier has made changes to the order document and accepted it, you need to create a change order for the same. Once you create the change order, the application creates a recent version. You can make the required changes in the new version and proceed with the document flow.
You can also create the change order if any requirements need to be changed.
You can create a change order only for the document in the Accepted, Open, Partially Accepted, Supplier Rejected, or Accepted with Changes states.
You must have the Change / Cancel Order activity to create change order.
To create the change order:
-
Open the desired document.
-
Click Create Change Order. The change order is created successfully, and the document returns to the Draft state. Please note that the Version field is incremented by one.
-
Make the required changes and click Submit to proceed with the document flow.
4.11 Copying Order
If you want to create a copy of an existing order document, you can use the Copy Order action. You can create a copy of the document that is in any state.
To copy the order:
-
Open the document to copy.
-
Click More > Copy Order.
-
Click Yes to confirm your action. The document is copied, and it opens in the Draft state.
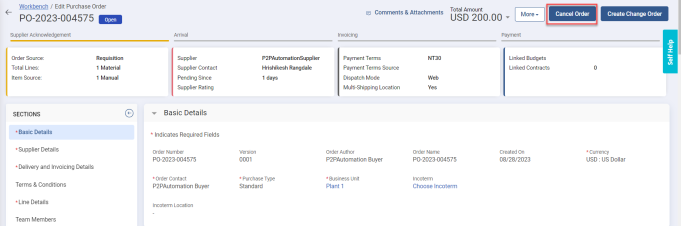
4.12 Cancelling Order
You can cancel the order if you no longer need it. It must be in the Accepted, Open, Partially Accepted, Supplier Rejected, or Accepted with Changes states.
You must have the Change / Cancel Order activity to cancel any order.
To cancel an order:
-
Open the document to cancel.
-
Click More > Cancel Order. The linked draft Invoices and Receipts will no longer be eligible for submission.
-
Click Yes to confirm your action. The order is cancelled and appears in the Cancelled state. Once the order is cancelled, you can revoke the cancellation.
To revoke the cancellation:
-
Open the document that you cancelled.
-
Click More > Revoke Cancellation.
-
Click Yes to confirm your action. The document returns to it earlier state.
4.13 Closing/Reopening Order
You can close the order once it is fully or partially fulfilled or do not want it. The order must be in the Accepted, Open, Supplier Rejected, or Partially Accepted state to close it.
To close the order:
-
Open the order to close it. Closing this order will restrict the processing of new and pending Receipts and Invoices. So, ensure to process all the pending documents.
-
Click More > Close Order. The order is closed successfully. The header status and all the lines are updated to Closed state. Also, in the Line Details section, the Closed for Receiving and Closed for Invoicing columns are automatically updated to Yes indicating that this order is now no longer available for creating receipts or invoices.
If you have accidentally closed any order document, the application allows you to reopen it.
To reopen the order:
-
Open the document that is in the Closed state.
-
Click Reopen Order. The document is reopened, all the lines are reopened, and the document returns to its previous state.
In addition to closing and reopening the document, you can also close and reopen at the line level. You must select the lines and click Close to close them and Reopen to reopen them. Once you close the line, it will be closed for Invoicing and Receiving. On reopening it, it will reopen for invoicing and receiving.
4.14 Viewing the Audit Log
You can also view the audit log of the actions performed on the document.
To view the audit log:
-
Open the document.
-
Click More > Audit Log. The Audit Log page opens.
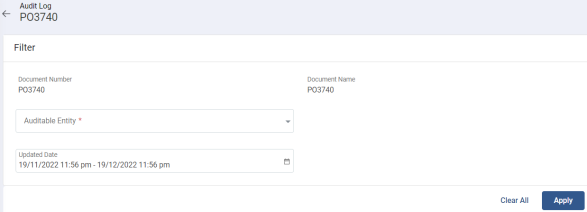
-
From Auditable Entity, select Sections.
-
(Optional) Enter the date range.
-
Click Apply. The details appear in the below grid. You can export the details in PDF and Excel. You can also view the Export logs.
4.15 Creating Goods Receipt
Once your order document moves into the Accepted or Partially Accepted state, you can create its goods receipt. You can create a receipt for lines that are in Accepted status.
You must have the Enable Centralized receiving activity to create receipts.
To create the receipt:
-
Open the document.
-
Click Create Receipt. All accepted lines will be flipped to a Goods Receipt document.
-
Click Yes to confirm your action. The Goods Receipts page opens in the Draft state with all the details.
|
Note |
Tip: Please refer to the GEP QUANTUM Procurement Receiver User Manual for instrcutions to fill the sections of Receipt document. |

4.16 Creating Invoice
Once your order document moves into the Accepted or Partially Accepted state, you can raise an invoice on behalf of the Supplier. You can create an invoice for lines that are in Accepted status.
You must have the Create Invoice by Flipping Order activity to flip order to an invoice.
To create an invoice:
-
Open the order document.
-
Click Create Invoice. All the accepted lines will be flipped to an Invoice document.
-
Click Yes to confirm your action. The Invoice page opens in the Draft state with all the details.
|
Note |
Tip: Please refer to the GEP QUANTUM Accounts Payable User Manual for instrcutions to fill the sections of Invoice document. |
When the Supplier Invoice is submitted, the Quantity and Amount column values are incremented in the API. For example, consider a scenario where two invoices of quantities 10 and 5 are created, then on submission of the first invoice, the Quantity is passed with value 10 and on submission of second invoice, the Quantity is passed with value 5.
When the invoice is rejected, cancelled, AP reject to Supplier, or AP Cancelled, then the application sends negative quantity and amount to the API. For example, if the order shows Total Invoiced Quantity as 15, and quantity 5 are cancelled, then the value sent from invoice to order will be -5.