Chapter 2: Understanding the PO Workbench
You can access the Purchase Order Workbench page by navigating to Purchasing > Purchase Order tab.
The Purchase Order Workbench page allows you to view the orders and perform actions on them. You can view the summary of the events on the top in the form of cards.
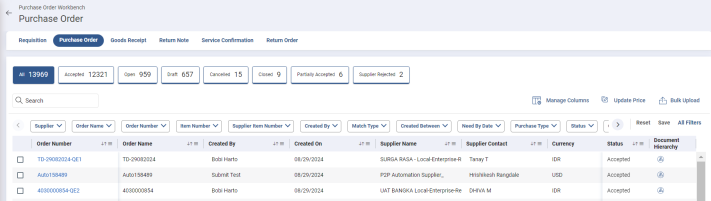
The cards on the top are the statuses, and the number indicates the count of order documents in that status. The documents in the grid are categorized based on their statuses. This page shows the following statuses:
-
All
-
Open
-
Accepted
-
Draft
-
Pending Approval
-
Rejected
-
Cancelled
-
Partially Accepted
-
Withdrawn
-
Accepted with Changes
-
Supplier Rejected
-
Closed
To view the order document of a certain state, click the respective card. For example, if you want to view the order documents that are rejected, click the Rejected card.
You can use the Search box to search for the required order document by using the document number, document name, etc.
You must have the View Orders activity to view the orders or Purchase Order Full View activity to view all the purchase orders.
The PO workbench displays the order document in the following columns:
-
Order Number
-
Order Name
-
Created By
-
Created On
-
Supplier Name
-
Supplier Contact
-
Currency
-
Shipping Status
-
Receiving Status
-
Invoicing Status
-
Order Line Sub Total
-
Order Line Total
-
Purchase Type
-
Function
-
Order Version Number
-
Ordering Location
-
Status
2.1 Managing Columns
You can manage the columns on this page by showing or hiding the required columns and freezing the columns to view the details properly.
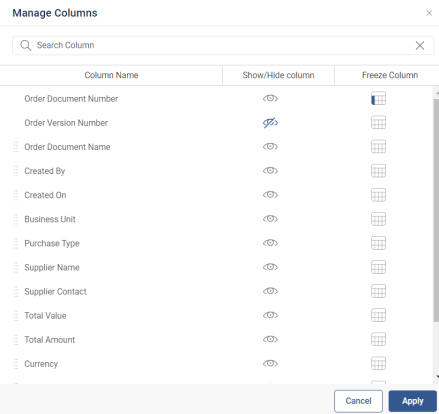
To show or hide the columns:
-
Click Manage Columns. The Manage Columns page opens.
-
To hide a column, click
 corresponding to the column name.
 -
To show a column, click
 corresponding to the column name.
 -
Click Apply.
To freeze the columns:
-
Click Manage Columns. The Manage Columns page opens.
-
Click
 corresponding to the column name to freeze that column.
 -
To unfreeze the same or another column, click
 .
. -
Click Apply.
2.2 Applying Filters
You can filter the documents in the grid using the available filters. You can either use the existing filters on the Workbench page or use advanced filters through the Filter slider.
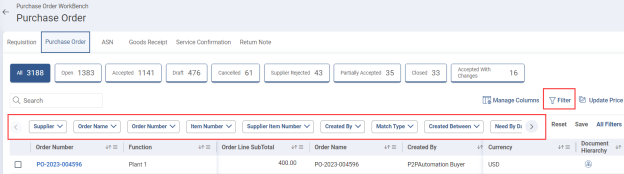
To apply filters:
-
Click the respective filter on the Workbench and enter the corresponding details to search the desired records. OR
-
Click
 Filter. The Filter slider opens.
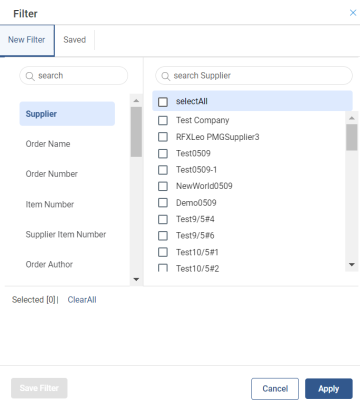
-
In the New Filter tab, click the column name from the left pane. You can also use the Search box to search for the column. The corresponding filter values appear in the right pane.
-
From the right pane, select the required filter. You can also save this filter for later use by clicking the Save Filter button. The saved filters appear in the Saved tab.
-
Click Apply. The selected filters are applied, and the records in the grid are filtered accordingly.
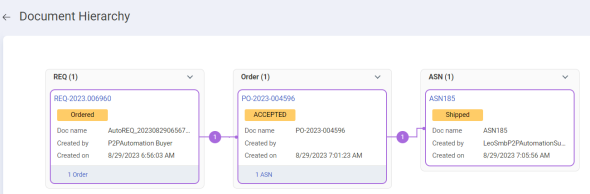
2.3 Viewing Document Hierarchy
This feature demonstrates the parent-child relations between all the linked documents. This feature is configurable by the Admin.
-
Setting Name: isNewUX
-
Description: It is a setting to enable Document Hierarchy on a document.
-
Possible Values: True/False
-
Required Value: True
-
Default Value: False
To view the document hierarchy:
-
On the Purchase Order Workbench, click
 under the Document Hierarchy column corresponding to the requisition. The Document Hierarchy page opens.
-
View the document chain and their respective document details.
2.4 Bulk Upload
You must have the Bulk Upload activity to upload an order. The bulk upload functionality allows you to upload multiple purchase orders. You can enter the PO details in the MS Excel or CSV file and upload via bulk upload.
![]()
To upload the orders:
-
From the Order Workbench page, click Bulk Upload. The Upload Orders page opens.
-
Click Browse to locate and select the file. The upload begins.
Note: This page only accepts files in MS Excel (.xlsx, .xls) and CSV (.csv) formats. Attempting to upload a file in any other format will result in an error.
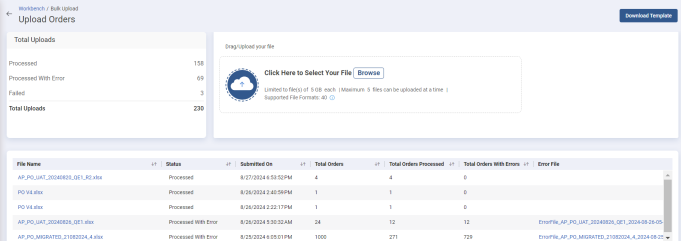
The pages include the Total Uploads section, which displays the following:
-
Processed
-
Processed with Error
-
Failed
-
In-progress
You can also see the summary view of uploaded files in the following columns:
-
File Name
-
Status
-
Submitted On
-
Total Orders
-
Total Order Processed
-
Total Orders with Errors
-
Error File
2.4.1 Download Template
The Bulk Upload page allows you to download the template that includes the details required to create a PO through bulk upload functionality. The columns in the template are similar to those in the UI.
To download the template, click Download Template on the Upload Orders page of Order Workbench.
![]()
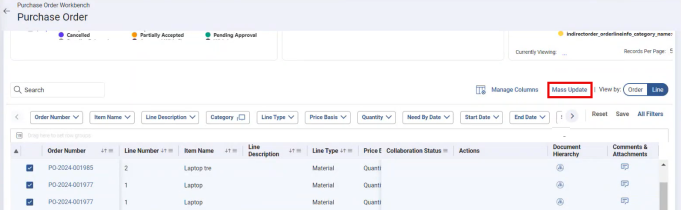
2.5 Mass Update
The Mass update allows you to take actions on multiple orders at the same time, including those at the header and line levels. You can perform both header and line levels from the workbench itself.
To update the Purchase Orders:
-
From the Order workbench, select the Orders that you want to Mass Update.
-
Click Mass Update. An Update Record slider opens.

-
Select the action you want to perform. For example, Accept, Reject, propose
-
Enter the update reason and click Update. A Mass Update View slider opens.
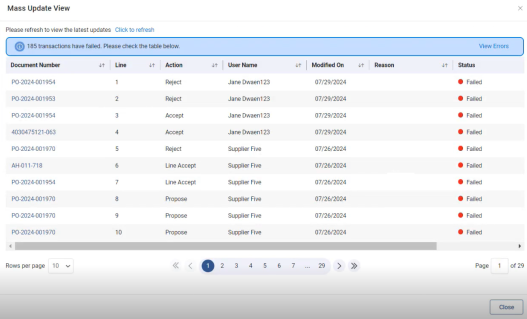
The Mass update view displays the history of all the tractions or updates that are performed in the following column:
-
Document Number – Indicates the document number.
-
Line – Indicates the line level.
-
Action – Indicates what action is taken for the orders.
-
User Name – Indicates the name of the performer.
-
Modified On – Indicates the date and time of the action.
-
Reason – Indicates the update reason.
-
Status – Indicate the status of the action.
-
Transaction Message – Indicates the message for failed actions. You can click Document Number and perform the same action for the individual document.